基于单片机的智能教室灯光控制系统设计(附程序清单)
来源:56doc.com 资料编号:5D21674 资料等级:★★★★★ %E8%B5%84%E6%96%99%E7%BC%96%E5%8F%B7%EF%BC%9A5D21674
资料以网页介绍的为准,下载后不会有水印.资料仅供学习参考之用. 密 保 惠 帮助
资料介绍
基于单片机的智能教室灯光控制系统设计(附程序清单)(论文17000字)
摘要:本设计基于Arduino Nano V3平台,制作完成了智能教室灯光控制系统。系统使用两组光电开关来模拟前后门并实现计数功能,使用光敏二极管检测教室周围光线的强度,以这两者的检测结果为依据进行灯光的自动控制。系统也可以手动通过按键来控制亮灯数。当前模式、实时人数和亮灯数都会通过液晶显示器进行显示。
对系统不同工作状态进行Proteus仿真和实物测试,实验结果表明系统具有比较好的稳定性和可靠性。将这样的智能系统应用到现代教室的灯光控制中,既可以减少不必要的浪费,节约用电,也可以方便教师考察学生出勤情况,与传统的打卡签到和点名比起来,更加节约时间。
关键词:Arduino Nano V3;光敏二极管;光电开关;液晶显示器;Proteus
Design of Intelligent Classroom Lighting Control System Based on Single-chip Microcomputer
Abstract: The design completes the intelligent classroom lighting control system based on Arduino Nano V3. The system uses two groups of photoelectric switches to simulate the front door and the back door respectively and realizes the counting function. A photosensitive diode is used to detect the intensity of light around the classroom. The automatic control of lighting is based on the results of photoelectric switches and photosensitive diode. The system can also manually control the number of lights by pressing buttons. The current mode, real-time number and the number of bright lights are displayed on the LCD.
Proteus simulation and physical test are carried out for different working conditions of the system. The experiment results show that the system has good stability and reliability. The application of this intelligent system to the light control of modern classroom can not only reduce unnecessary waste, save electricity, but also facilitate teachers to investigate the attendance of students. Compared with the traditional clock sign in or naming, this system is more time-saving.
Key words: Arduino Nano V3; Photosensitive Diode; Photoelectric Switch; LCD;Proteus

目录
第一章 绪论 1
1.1 选题背景与意义 1
1.2 国内外研究现状 1
1.3 论文结构 2
第二章系统整体设计 3
2.1系统方案的设计 3
2.2 单片机的选择 3
2.3 光线检测器件的选择 4
2.4 显示器件的选择 4
第三章 硬件设计与分析 4
3.1 主控芯片 4
3.2 电源 4
3.2.17805三端稳压器 5
3.2.2 连接方法 5
3.3 人数统计电路 5
3.3.1 光电开关 5
3.3.2 人数统计电路连接 5
3.4 光线检测电路 6
3.4.1 光敏二极管 6
3.4.2 光敏二极管模块 6
3.4.3 光线检测电路连接 7
3.5 显示电路 7
3.5.1 1602液晶显示屏 7
3.5.2LCD1602的转接板 8
3.5.3 显示电路连接 9
3.6 按键电路 9
3.6.1 按键工作原理 9
3.6.2 按键抖动 10
3.6.3 按键消抖 10
3.6.4 按键电路连接 10
3.7 LED控制电路 11
第四章软件设计与分析 11
4.1 Arduino开发工具 11
4.1.1 Arduino开发工具的作用 11
4.1.2 Arduino开发工具的选择 11
4.2 Arduino IDE 12
4.2.1 Arduino IDE的下载和安装 12
4.2.2 Arduino IDE功能介绍 12
4.3 Arduino程序 13
4.4 程序流程图 13
4.4.1 主程序 14
4.4.2 人数统计函数 14
4.4.3 判断函数 15
4.4.4 LCD1602显示函数 16
第五章 原理图绘制与仿真 17
5.1 Proteus软件介绍 17
5.1.1Proteus软件的特点 17
5.1.2Proteus软件的安装 18
5.2 原理图绘制 18
5.3 仿真前准备 19
5.3.1 Hex文件的保存 19
5.3.2 Hex文件的导入 19
5.4 仿真结果 20
5.5 仿真中出现的问题 22
第六章焊接与调试 22
6.1 实物焊接 22
6.2 程序的编译和烧录 24
6.3 硬件调试结果 24
第七章 总结与展望 26
7.1 设计总结 26
7.2 优点与不足 27
7.2.1 优点 27
7.2.2 不足 27
7.3 展望 27
参考文献 28
致谢 29
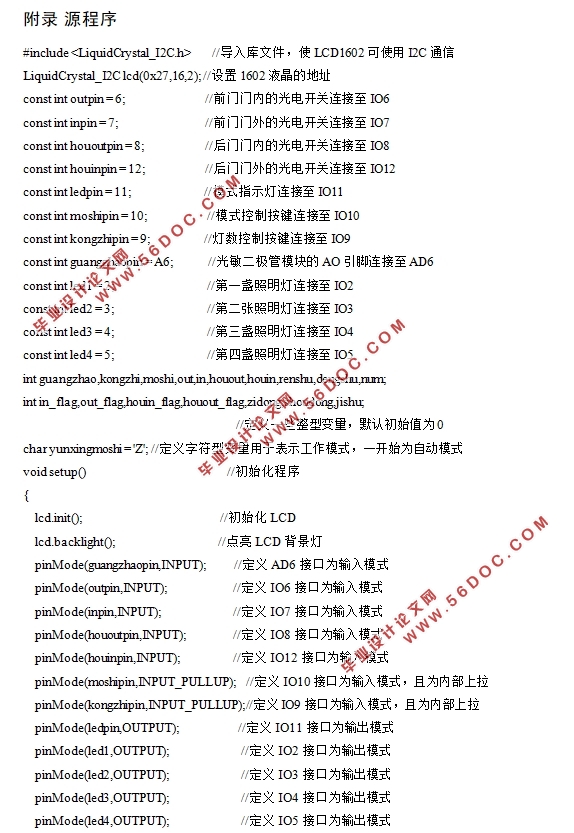
附录 源程序 30
|
